Orders & Worldwide
Orders & Worldwide

Robots, much like any other machinery, require regular care and maintenance to ensure they operate at peak efficiency. For OTC robots, a systematic approach to maintenance not only prolongs the life of the equipment but also helps prevent unexpected downtimes. In this article, we delve into the periodic inspection and maintenance schedule that is crucial for the upkeep of OTC robots.
I. Daily Inspection
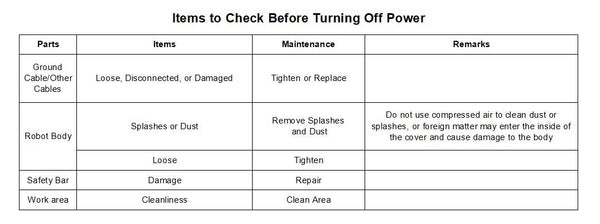
Items to check before turning off power

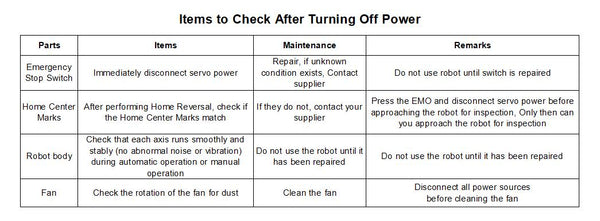
Items to check after turning off the power

Note: Make sure that no one is in the robot's operating area before turning off the power.
Three-Monthly Inspection

One-year Inspection

II. Periodic Inspection
1. Biennial Maintenance: Battery Replacement
At the two-year mark, it's essential to replace the batteries within the robot's main body. These batteries are critical for maintaining the robot's system settings and any temporary data. Over time, batteries can lose their ability to hold a charge, which can lead to data loss or system malfunctions. By scheduling a battery replacement every two years, you can prevent these issues and ensure that your robot retains its settings and operates reliably.
2. Triennial Maintenance: Gearbox and Timing Belt Care
After three years of operation, it's time to focus on the robot's mechanical components, particularly the reduction gears and timing belts. The gears within the robot's joints require lubrication to reduce friction and prevent wear. Applying the appropriate lubricant not only prolongs the life of the gears but also ensures smooth and precise movement.
Simultaneously, the timing belts, which are responsible for the transmission of power in the robot's drive system, need to have their tension adjusted. Over time, belts can stretch or lose tension, leading to inaccuracies in the robot's movements. Adjusting the tension keeps the belts at the optimal tightness, maintaining the robot's performance and accuracy.
3. Quadrennial Maintenance: Internal Wiring Replacement
As the robot reaches four years of age, it's crucial to inspect and replace the internal wiring. Wiring can degrade due to continuous use, temperature changes, and exposure to the elements within the industrial environment. Deteriorated wiring can pose a risk of short circuits or failures. By replacing the wiring, you can ensure the robot's electrical system remains safe and functions correctly.
4. Quintennial Maintenance: Timing Belts and Control Cabinet Battery Replacement
Fives years into the robot's service life, it's time to replace both the timing belts and the batteries in the control cabinet. As mentioned earlier, timing belts can wear out and affect the robot's precision. Replacing them ensures continued accurate operation.
The control cabinet batteries, similar to those in the robot's main body, are vital for preserving system settings and data. Over time, these batteries can degrade, potentially leading to loss of configuration settings or other critical data. Replacing them every five years ensures the control system remains reliable and that no data is lost.
III. Replacing the Encoder Battery
A battery is included in the robot body to back up the absolute encoder data.
The battery life varies depending on the operating environment, so please replace the battery with a new one every two years. Failure to do so will result in loss of absolute encoder data and the need to re-teach the home position. Please back up the teach data before replacing the battery to prevent loss of the teach program or setup parameters.
Disconnect the robot from power before replacing the battery.
Battery Replacement Sequence

Check the life of the battery and replace it with a new one if it is more than 2 years old.

Remove the covers (3 covers) shown in Figure 2 "A". Disconnect the old batteries and insert the new ones (remove the nylon clips that hold the batteries in place). Alternatively, replace the batteries when the robot displays the "Check Lithium Batteries" message.
After replacing or checking the batteries, insert the cables, secure the nylon clips, and finally replace the cover at A.
The article and images are from the internet and are copyrighted by the original authors.
0 von 3 Elementen ausgewählt
Wählen Sie das erste zu vergleichende Element aus
Wählen Sie das zweite zu vergleichende Element aus
Wählen Sie das dritte Element zum Vergleichen aus
Einen Kommentar hinterlassen